In this blog post, we'll explore how to implement OAuth2 authentication in an Angular application using the angular-oauth2-oidc library. OAuth2 authentication is essential for securing web applications, and using a library like angular-oauth2-oidc simplifies the integration process. We'll cover the setup, configuration, and usage of the library to enable OAuth2 authentication seamlessly in your Angular project.
Introduction to OAuth2 Authentication
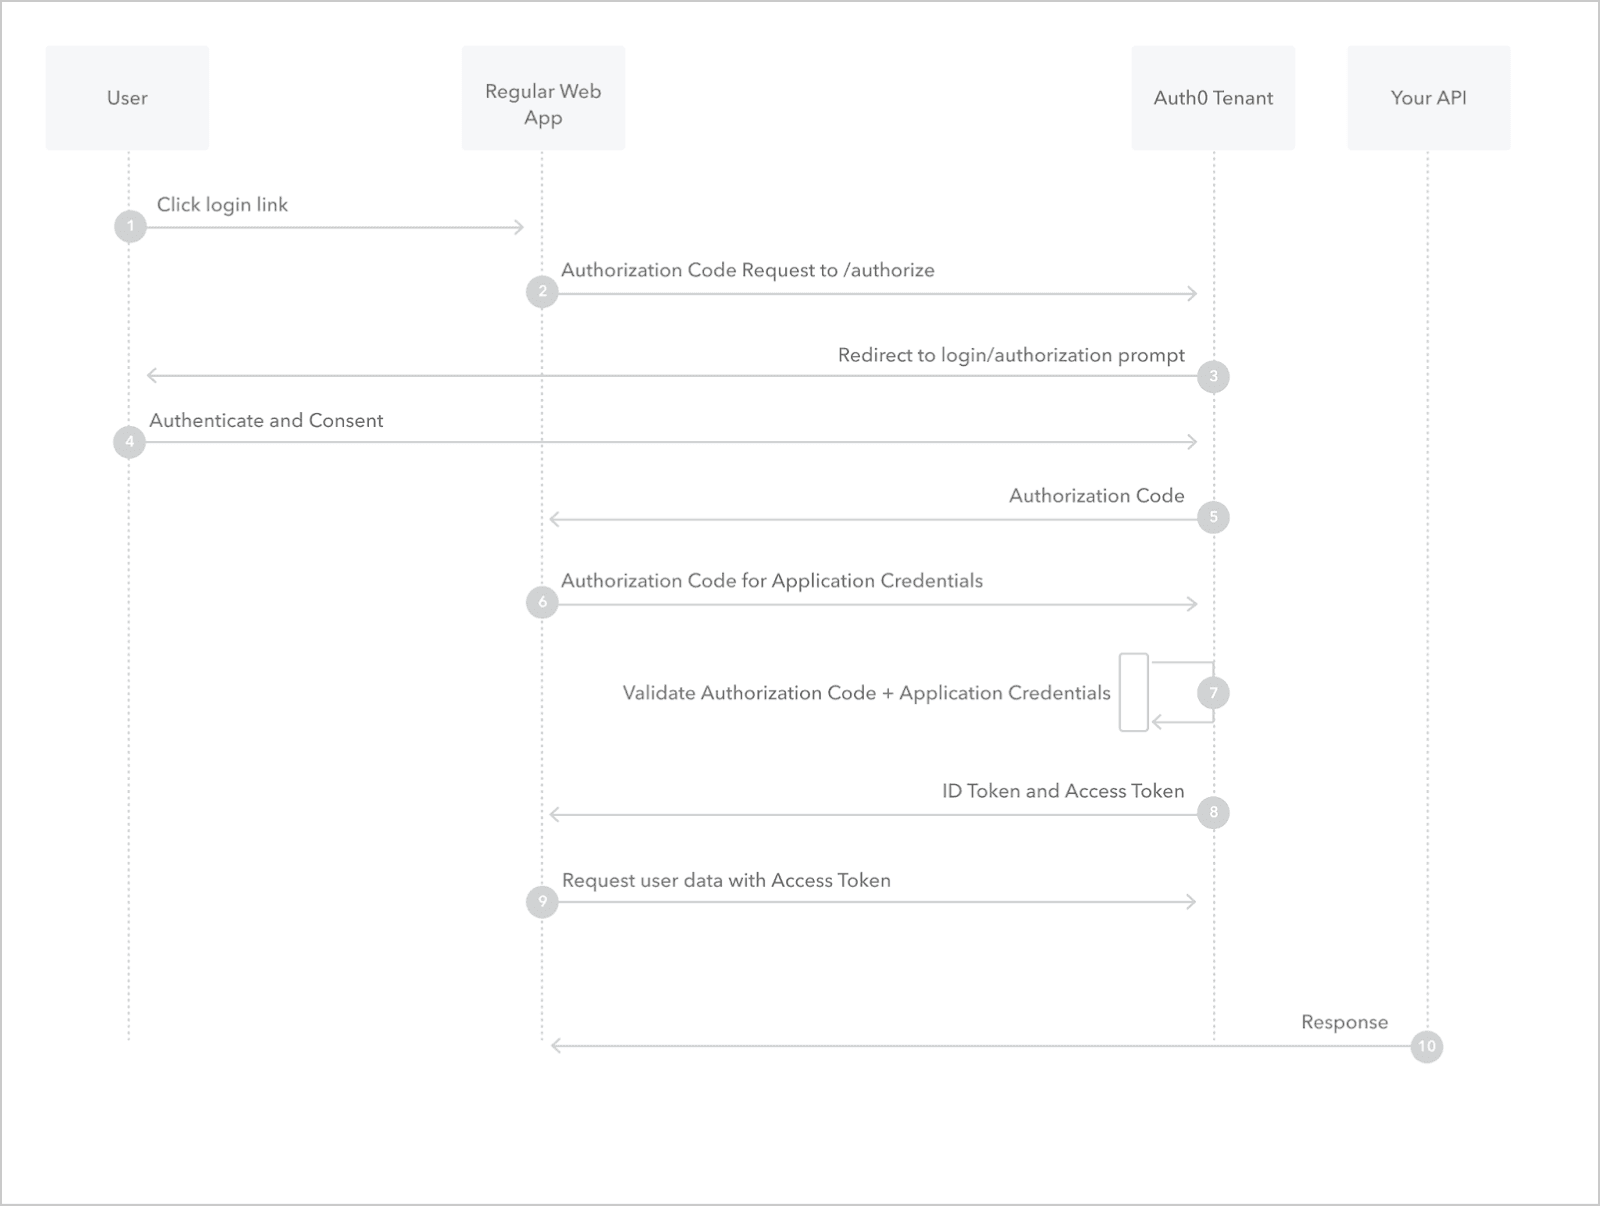
OAuth2 is a widely used authentication framework that allows applications to securely access resources on behalf of users. It provides a standardized protocol for authorization and enables users to grant access to their data without sharing their credentials. You can click here to know more about how authorization code flow works.
Implementation
To implement OAuth2 in Angular using the Angular OIDC library, you can follow these steps:
- Install the angular-oauth2-oidc library.
- Configure the OIDC client in your Angular application.
- Use the OIDC client to authenticate users and manage tokens.
Step 1: Installation
First, let's install the angular-oauth2-oidc library and its dependencies using npm:
npm install angular-oauth2-oidc
Step 2: Configuration
Next, configure the OAuth2 client settings in the environment.ts file of your Angular project:
// environment.ts

export const environment = {
  production: false,
  auth: {
    issuer: 'https://your-auth-server.com',
    redirectUri: window.location.origin + '/callback',
    clientId: 'your-client-id',
    dummyClientSecret: 'your-client-secret',
    scope: 'openid profile email',
    responseType: 'code',
    tokenEndPoint: 'https://your-auth-server.com/as/token.oauth2',
    requestAccessToken: true,
    revocationEndpoint: 'https://your-auth-server.com/as/revoke_token.oauth2',
    logoutUrl: 'https://your-auth-server-logout-url.com',
    showDebugInformation: true
  }
};
Step 3: Initializing OAuth2
Create an auth module and inside that create an authentication service to manage OAuth2 authentication and initialize the OAuthService with the provided configuration:
// auth.service.ts

import { Injectable } from '@angular/core';
import { OAuthService } from 'angular-oauth2-oidc';

@Injectable({
  providedIn: 'root'
})
export class AuthService {

  constructor(private oauthService: OAuthService) { }

  initAuth() {
    this.oauthService.loadDiscoveryDocumentAndLogin();
  }

  isAuthenticated(): boolean {
    return this.oauthService.hasValidAccessToken();
  }

  login() {
    this.oauthService.initLoginFlow();
  }

  logout() {
    this.oauthService.revokeTokenAndLogout();
  }

  getToken(): string {
    return this.oauthService.getAccessToken()
  }
}
Step 4: Protecting Routes with Auth Guard
Implement an authentication guard to protect routes that require authentication:
// auth.guard.ts

import { Injectable } from '@angular/core';
import { CanActivate, Router } from '@angular/router';
import { AuthService } from './auth.service';

@Injectable({
  providedIn: 'root'
})
export class AuthGuard implements CanActivate {

  constructor(private authService: AuthService) { }

  canActivate(): boolean {
    if (this.authService.isAuthenticated()) {
      return true;
    } else {
      this.authService.login()
      return false;
    }
  }
}
Step 5: Using in AuthModule
Update the AuthModule to configure the oauth2 configuration then include the AuthService, AuthGuard and run initial login sequence on page load by adding them in providers.
// auth.module.ts

import { NgModule, APP_INITIALIZER, ModuleWithProviders } from '@angular/core';
import { CommonModule } from '@angular/common';
import { AuthConfig, OAuthModule, OauthStorage } from 'angular-oautj2-oidc';
import { AuthService } from './auth.service';
import { AuthGuard } from './auth.guard';
import { environment } from 'src/environments/environment';


function authAPPInitializerFactory(
  authService: AuthService
  ): () => Promise<void>{
    return () => authService.initAuth();
}

// By default seesionStorage is used
export function storageFactory(): OauthStorage {
  return localStorage;
}

@NgModule({
  declarations: [],
  imports: [
    CommonModule,
    OAuthModule.forRoot()
  ],
  providers: [
    AuthService,
    AuthGuard
  ],
  bootstrap: [AppComponent]
})
export class AuthModule {
  static forRoot(): ModuleWithProviders<AuthModule> {
    return {
      ngModule: AuthModule,
      providers: [
        {
          provide: APP_INITIALIZER,
          useFactory: authAPPInitializerFactory,
          deps: [AuthService],
          multi: true,
        },
        { provide: AuthConfig, useValue: environment.authConfig },
        { provide: OAuthStorage, useFactory: storageFactory }
      ]
    }
  }
 }
Step 6: Using in AppModule
Update the AppModule to add AuthModule.
// app.module.ts

import { BrowserModule } from '@angular/platform-browser';
import { NgModule } from '@angular/core';
import { AppComponent } from './app.component';
import { RouterModule, Routes } from '@angular/router';
import { AuthModule } from './modules/auth/auth.module';


const routes: Routes = [
  // Define your routes here
];

@NgModule({
  declarations: [
    AppComponent
  ],
  imports: [
    BrowserModule,
    RouterModule.forRoot(routes),
    AuthModule.forRoot()
  ],
  providers: [],
  bootstrap: [AppComponent]
})
export class AppModule {}
Conclusion
In this blog post, we've explored how to implement OAuth2 authentication in an Angular application using the angular-oauth2-oidc library. By following the steps outlined above, you can seamlessly integrate OAuth2 authentication into your Angular project, enhancing security and providing a smooth user experience. OAuth2 authentication is essential for securing web applications, and leveraging libraries like angular-oauth2-oidc simplifies the integration process, allowing you to focus on building great user experiences.